Translate

Näytetään tekstit, joissa on tunniste DIY. Näytä kaikki tekstit

perjantai 25. marraskuuta 2016

DIY Drum Stick Holder

Engrish:

Finally got this idea out of my mind and forged by hands!

Again one example that throwing away useful stuff is not an option. Saved money and got to do a small DIY project after day at the office.

Receipe:

2pcs 20cm Old pipe from the lamp
1pcs Old Millenium clamp
6mm Nuts and bolts and wingnut
2pcs Pipe holders
Saw/Dremel/File
Wine Bottle Corks
Drop of Insanity and time

And here we have DIY Telemetric Drum Stick Receiver! ;)


Ja sama suomeksi:
Vihdoin sain tämän idean ulos päästäni ja toteutettua käsilläni.

Jälkeen yksi esimerkki siitä, että kaikkee kantsii olla. Säästyy massia ja saa näpertää itekseen jotain toimistohommien jälkeen.

Resepti:

2kpl 20cm putkea sahattu vanhasta jalkalampusta
1kpl Vanha Millenium klämppi
6mm Pultti ja muttereita, siipimutteri
2kpl Putkenkannattimia
Saha/Dremel/Viila
Viinipullonkorkkeja
Ripaus hulluutta ja aikaa


Ja alla näette telemetrisen rumpukapulasiepparin! ;)

DIY Telemetric Drum Stick Receiver

Inspired by/Inspiraatiot tältä jäbältä:

tiistai 26. huhtikuuta 2016

DIY Subkick microphone / Recording session

Let me introduce you every drummers wet dream: The subkick microphone!

The pad itself was made some years ago by a familiar engineer and I was waiting the opportunity to test it in a recording situation. A month ago I was recording one cover song and decided to finally test it. I was amazed how it sounded out together with the T-bone bass drum microphone. The speaker element I used is an BZ200 bass element from the old B&W speakers.

The pad is in use because I don't want to brake expensive audio interfaces with too hot input-signal. The pad is not difficult to make, Google for schematics or ask for your family member or friend for guidance, if you are not yet familiar with right components and soldering.

I myself am still learning and I've noticed that best way to learn might be to start fixing something simple electronics or cables. Be careful though and not hurt yourself or others while you work with electricity!

Audio sample coming later. Here's pic of subkick and some other pictures from the studio:


Micing setup
Subkick with B&W element

Pair of choice, Balbex

Suomeksi:

Rumpalin märkääkin märempi uni: subkick mikki!

Sain pari vuotta sitten subkick padin tutulta insinööriltä. Nyt päätin kokeilla sitä käytännössä erään cover-biisin nauhoituksissa. Kuulostaa järkyttävän hyvältä yhdessä T-Bonen basarimikin kanssa. Käytössä oleva kaiutinelementti (BZ200) on vanhoista Bowers & Wilkins kaiuttimista

Tuommoisen padin voi osaava kaveri tehdä itsekin tai sitten pyytää tuttua auttamaan oikeiden komponenttien ja juottamisen kanssa. Googlesta löytyy hyviä ohjeita! Padi tarpeen siitä syystä, ettei laitteet mene rikki liian kuuman signaalin kanssa.

Itse olen aloittanut opintomatkani elektroniikan parissa lähinnä korjaamalla pikkuvikaisia pieniä laitteita ja johtoja. Haaveet isommista projekteista elävät ja joka päivä opitaan jotain uutta! Kantsii olla varovainen, kun puuhastelee elektroniikan ja sähkön parissa.

Yllä kuvia laittehesta ja studiosta. Äänisamplea kuulette myöhemmin!

-A.

tiistai 31. maaliskuuta 2015

Kiinnitys basarimikille / DIY Bassdrum Microphone Adapter

På Engelska:

Here's a little quickie for you! While searching imageshack for other purposes I found these old pictures that I posted some years ago to this forum. Now I want to share them with you. The mod itself is simple if you have the right parts already lying somewhere in your rehearsal chamber or at home.

I used an old Millenium cymbal boom stand, a Millenium drum clamp and a T-bone BD 300 mic. The counterweight in cymbal stand had exact same threads as the microphone so it was easy as putting Lego-blocks together. I used my Dremel to cut the boom's other end just a little bit and then filed it. Then it was attached to clamp which was then attached to Pearl tom arm. The mic cable was thrust through an empty tom holder hole. The only problem was the vibration when playing or I don't even think it was a problem, it was more like an attribution to the sound of the drum set.


Samma på finnish:

Tässäpä pikainen modi sinulle! Kun selasin imageshackia, niin löysin nämä vanhat kuvat, jotka joskus postasin Drummerworldin foorumille. Nyt jaan ne just sulle! Modi itessään on heleppoa kuin legopalikoiden kasaus, jos sulla on tuon sorttiset osat joutilaana reenistelykämpässäs tai kotosallasi.

Omaan modiini käytin vanhaa Millenium puomiständiä, saman valmistajan klämppiä ja T-bonen BD-300 basarimikkiä. Puomiständin vastapainon kierteet sattuivat olemaan justiinsa saman kokoiset kuin basarimikin kierteet, joten 1+1 tekee arvaatte varmaan mitä? Dremeliä käyttäen (muista silmä- ja korvasuojukset!) lyhensin puomia toisesta päästä ja viilasin niin vimmatusti. Sitten kasasin koko komeuden kuvassa olevalla menetelmällä. Vähänhän tuo resonoi kaikenlaista settisoundia basarimikkiin, mutta jos se ei ole ongelma, niin se on enemmänkin ominaisuus.

Bass drum Microphone adapter v. 1.0

lauantai 7. helmikuuta 2015

Fever words

I've never been man of many words, so everything in nutshell: I wanted to make stick for many purposes. Today I bought couple of different slim round wooden birch sticks from Hobby Point Helsinki and made mallet/hot rod drum sticks from them. Cymbal pads & pipe seals, together with some artifacts from office lamp stand to hold together did the thing. Seriously, ask for more details. Finish is on the way, beware the black commando at war!
Custom sticks on the way

lauantai 24. tammikuuta 2015

Symbaaliplektra Kosti Orbinskille / DIY Guitar Pick for Kosti Orbinski

Kosti Orbinski from Sotajumala wanted to order a custom made cymbal guitar pick for himself. I was lucky enough that I had just couple roughly made Dunlop Jazz III models that he is normally using while playing and today I picked up one that felt just right for him. This time I roughened the surface a bit and also drilled hole in the middle of the pick to get more grippy pick. Finish on the pick was done with Dremels grinding tool, sanding tool and by wet sanding. A bit of polish on the surface and it was ready to be sent. Rock 'n' roll good times with this pick Kosti!

Sotajumalan kitaristi Kosti Orbinski tilasi minulta kustom-plekun. Minulla oli juuri sattumoisin pari raakiletta odottamassa työstöä hänen käyttämästään Dunlop Jazz III -mallista ja tänään käteeni osui sopiva aihio, jonka tein valmiiksi. Tällä kertaa karhensin pintaa hieman ja tein plekun keskelle reiän, saavuttaakseni paremman gripin. Plektra on viimeistelty Dremelin grindaus- ja hiomistyökaluilla, sekä vesihionnalla. Pikkaisen vahaa pintaa ja pleku oli valmis lähetettäväksi. Hyviä rokkenroll hetkiä Kostille tämän plekun parissa!

Custom made Jazz III for Kosti Orbinski 

PS. Sotajumala has just released their newest album, so I need you to check it out and give your support to these great talented guys! Buy their album 'Raunioissa' or listen it from here and please, spread the word! Death Metal Finland!

JK. Sotajumala on paras, tukekaa! Ostakaa tai kuunnelkaa uusi levy 'Raunioissa" täältä ja laittakaa sana kiertämään. Suomi Death Metal!

sunnuntai 14. joulukuuta 2014

Löylykauhu / Steamhorror: DIY Drumstick Ladle (DIY Drum Stick Modifications)

Muistatko vielä aiemman postaukseni, jossa kerroin rumpukapuloiden uusiokäyttötapoja? Tässä jälleen yksi sellainen. Sain idean keskellä yötä ja en malttanut nukkua, niin hienolta tämä ideani tuntui. Ja todellisuudessa se toimi jopa paremmin kuin olinkaan kuvitellut. Pidemmittä puheitta, tässä teille upeanmahtava Löylykauhu!

Do you still remember this older post in my blog where I gave you some examples how to recycle your drumsticks? Well I've another one for you. I came up with this idea in the middle of the night and had to get right to it, because I couldn't get sleep thinking how great that idea was. And it really worked out even better I could have imagined. Long story short, I give you aaaaaaaaallllllmightyyyy Steamhorror!


Löylykauhu / Steamhorror
Kissankarvaa ja Löylykauhu / Cat hair and Steamhorror
Löylykauhun kuppi on tehty vanhan pöytälampun ala-osasta ja varsi on... no rumpukapula tietenkin! Sain kolvata pienen palan symbaalia kuppiin uudella kolvillani. Koitapa itse generoida löylyä johtamalla vettä kuumille kiville reikäisellä kauhalla.

The bowl is made from old lamp bottom and the handle is... yep, an old drumstick! There's a little piece of cymbal soldered in the lamp bottom, because it's not fun to try and generate steam by administering water to hot stones with ladle that has hole in it.


keskiviikko 10. joulukuuta 2014

Clockwork Tyrant (DIY Cymbal Clock)

Suomeksi:

Olen unelmoinut ikiomasta symbaalikellosta ja tänään posti toi vihdoinkin osat sitä varten. Symbaali on Turkkilaisen Alchemyn käsinvalmistama 14" Pro A.R.T. Hi-hihat Top (handmade by A. & S. Tomurcuk). Se oli aktiivisessa käytössäni monta vuotta ykköshi-hattinani. Valitettavasti se kuitenkin murtui reunastaan, todennäköisesti silloisesta huonosta soittotekniikastani johtuen, ja jäi näin odottamaan muita käyttötarkoituksia.

Tänä syksynä leikkasin symbaalin peltisaksilla pienempään kokoon, jonka jälkeen hioin sen dremeliä ja viilaa käyttäen. Lopuksi annoin sille vielä pienen vesihionnan, jotta reuna ei leikkaisi sormia. Logot poistin käyttäen kynsilakanpoistoainetta, Cillit bangia, vettä ja karhunkieltä. Oli muuten erittäin tiukassa nämä logot, joten siitäkin pisteet valmistajalle. Tämän jälkeen osien nopea kokoonpano ja violà! Vaimoke tokaisi: "Miksi kaikki täytyy aina valmistaa rumpujen osista?" No miksipä ei? Ne ovat uniikkeja, kauniita ja persoonallisia esineitä, joita ei ihan joka kodista löydy. Tällä tavoin voin myös jatkaa elämäntyyliäni sillä aikaa, kun ei ole paikkaa jonne voisin pystyttää seksikkään rumpusettini.

Ja muuten, Alchemy valmistaa hienon kuuloisia symbaaleja. Itselläni on ollut tämän Pro A.R.T. haitsun lisäksi yksi 16" crash heidän valikoimastaan. Pienelläkin budjetilla pääsee käsiksi uniikkeihin käsintehtyihin symbaaleihin. Suosittelenkin kokeilemaan koneellisesti valmistettujen geneeristen symbaalimerkkien entry-level sarjojen sijaan, joita monet lippulaivoin varustetut symbaalivalmistajat tuottavat aloittelijoita ja harrastelijoita varten. Saatan myöhemmin katsastaa Alchemyn tämän hetken tarjonnan, kun uusien symbaalien hankinta tulee jälleen ajankohtaiseksi.

Viime aikoina olen myös asettanut cajoniini pieniä loitsuja ja yksi isompi projekti on meneillään. Kerron lisää näistä molemmista myöhemmin!

In English:

I've dreamed of making my very own cymbal clock and I finally got the parts for it today. The cymbal itself is Turkish Alchemy 14" Pro A.R.T. Hi-hihat Top, handmade by A. & S. Tomurcuk. Fortunately it cracked during the hard playing years and over since it's just been lying there without no use, until this fall. Now that I think my technique wasn't very good at that time and it might be the reason I cracked this hi-hat.

By the way, Alchemy is making quite good sounding cymbals. I've had these 14" hats and one 16" crash from them. Even with low budget you can get your hands into unique sounding handmade cymbals. Maybe I look forward to buy some from their collection later.

On the process itself then: I cut the cymbal down couple of weeks ago with a tin snips, grinded it a bit with a dremel and a file and finally wet sanded the edge to somewhat smooth so it won't cut any fingers. I removed logos using nail polish remover, Cillit Bang, water and a bear tongue. The logos were very hard to remove, so props to the manufacturer for the quality. A quick assembly and violà! My wifey said: "Why everything had to be made from drum equipment?" Well, why not? They are unique, beautiful and personal items and can't be found from every home. This is the way to carry on my lifestyle while I've no place to set-up my sexy drumkit.

Also my cajon got some nice little enchantments to it and there's one other bigger project going on. I'll tell you more about them later!

DIY Cymbal Clock made from 14" Alchemy Pro A.R.T Hi-hat Top
DIY Cajon Mysteries

Jk. Heinäkuussa 2014 nauhoitin cajonia Volucrinen "Acid Raindance - Acoustic Epilogue" -kappaleeseen. Lisäinfoa täältä: http://www.volucrine.com/archives/548

PS. In July 2014 I recorded some cajon parts for Volucrine's song "Acid Raindance - Acoustic Epilogue". Some more info and how to get EP on your hands can be found from here: http://www.volucrine.com/archives/548 (Finnish only)


tiistai 25. marraskuuta 2014

DIY March Drum Sling

Today I once again found out that one must never throw away things he thinks he definitely might need someday. I had this strap/sling from somewhere and I find out it's perfect for doing DIY marching drum sling just about in seconds! Taking pictures actually took a lot longer than the mod itself. Enjoy and keep on marching!

Tänään tajusin taas kuinka arvokkaita jotkin mitättömältä tuntuvat tavarat saattavat yhtäkkiä ollakaan. En siis jatkossakaan heitä pois tavaroita, joista olen varma, että tarvitsen niitä jossakin tulevaisuudessa. Löysin tuollaisen nauhan äskettäin ja päätin tehdä siitä marssirummulle kiinnikkeen. Itse modiin meni vähemmän aikaa kuin kuvien ottamiseen. Nauttikaa ja marssikaa jatkossakin!

Ready!

Set!


Aaaannnndd... ACTION!

DIY Cymbal Stand Lamp

Earlier I promised you pictures of DIY cymbal stand lamp, so here they are. I used an old Millenium cymbal stand, Millenium clamp and a nice old table lamp for this mod. Cymbal stands boom has been already shortened earlier. On top of the stand I drilled a small hole for the wire so the wire would be inside the stand, or at least most of it. Then I unattached the tubes and put the wire inside. Of course I had to cut the wire at the bottom first, because the plug couldn't fit inside the tube.

I didn't have soldering iron and I used only tape so unfortunately this prototype was not save enough to be in use at long period. I've already defused this whole thing, but now I'm prepared to have cymbal stand lamp whenever I need it somewhere after I get right parts and equipment for a stable one. The lamps socket was a bit broken.

Aiemmin lupasin kuvia tee-se-itse symbaaliständilampusta ja tässähän näitä. Käytössäni oli vanha Millenium puomiständi ja vanha pöytälamppu. Puomi oli lyhennetty jo aiemmassa projektissani. Ständin yläosaan porasin pienen reiän johtoa varten, jotta se kulkisi nätisti ständin sisällä (tai ainakin suurin osa siitä). Sen jälkeen irroitin ständin varren ja katkaisin pätkän johtoa, koska plugi ei mahdu kulkemaan ständin sisältä. Sitten vain johto ständin läpi ja liitetään johdot takaisin yhteen toisessa päässä.

Käytössäni ei vielä ole kolvia, joten käytin tähän prototyyppiin vain johdon teippausta. Tämä härveli tuli jo purettua osiin odottamaan parempia päiviä ja aikaa jolloin saan kolvin ja sopivat osat kätösiini. Lampun kanta oli nimittäin hieman rikkinäinen, joten laite ei olisi pidemmän päälle turvallinen.

And the pics/Kuvat:


Have fun making your own DIY cymbal stand lamp and be safe!

Pidä hauskaa tehdessäsi omaa tee-se-itse symbaaliständilamppua ja muista turvallisuusseikat!

lauantai 18. lokakuuta 2014

DIY Drum Stick Jewelry

I made some jewelry out from scrap. Feels good! I also made lamp out of an old cymbal stand and an old night lamp. Pictures of that coming soon!

Tein aikani kuluksi korun! Tuli väsättyä myös lamppu vanhasta symbaaliständistä ja yövalosta. Kuvia siitä projektista lisäilen myöhemmin tänne pällisteltäväksi.
Piece of Jewelry

torstai 27. helmikuuta 2014

Brushing drumvival situation (DIY Drum Brush)

Here we are in typical survival situation:

You don't have any money. You can't borrow the money or lend the brushes, because you don't have any friends. You still want to have brushes to play with. Stealing is not an option.

All you got is this:

- broken drumstick
- a piece of thick stereo cable from worn out speakers
- almost an empty roll of duct tape or heat shrink tubing
- some glue
- wire cutter or knife
- drill

What you are going to do is this:

First strip of wires but leave some cover at the other end then twirl the wires to suitable turds. Drill hole to the end of drumstick for them. Add glue to the hole and stick the wire turds in. Use the miracle tape of Jesus Christ himself to strengthen the attachment. Voilà!
Now go find another broken stick so you can play with them brushes.

Drumvival Brush

Edit 28092014:

These didn't work out as good as I thought. Maybe using a bit stronger material like old guitar strings etc would help.


maanantai 2. joulukuuta 2013

Proper drumming clothing (DIY Drum Clothing)

One night I couldn't sleep so I tried to dig some cool shape out of an old ragged black tank top. The whole process was done in the bathroom.

Here's how it goes:

1. First drew drumstick shapes to greaseproof paper with the help of your favorite drumsticks. I used Steve Gadd sticks and shortened the stick shape a bit. Use your imagination!

2. Then tape the pattern to the cloth roller cleaned shirt. I also placed thick cardboard inside the shirt, so bleach wouldn't go into backside of the shirt. Don't hesitate on this part! I did, so result aren't perfect.

3. Pour the bleach CAREFULLY in to the (small) spray bottle. Only bottle I found at that moment was a bit too small, but did the job fine after a couple of re-fillings.

4. Spray the bleach on the pattern. Leave the shirt for awhile and let the bleach do the job. Don't let animals or children anywhere near this process.

5. Come back, flush and rinse the shirt well on a sink or on the bathroom floor. Let the shirt dry. Remember that bleached clothes can ruin other clothes as well in the washing machine if not flushed properly!

6. Use black clothing marker to fix some parts if necessary.

7: Tada! New drumming shirt to put on to your next rehearsal or gig.

If you are planning to do something like this REMEMBER to:
 - be safe!
 - use gloves!
 - don't hesitate!
 - watch your eyes!
 - do it in the bathroom or somewhat similar space with a good ventilation!
 - use respirator if possible!
 - know what you are doing!

And again don't let animals or children anywhere near the bleaching process!

1. Ingredients 2. Rock on!

tiistai 20. elokuuta 2013

Cat toy (DIY Drum Stick Cat Toy)

DIY cat toy
I made this cat toy using a Steve Gadd drum stick, shoelace and couple of feathers from a golden pheasent and ostrich. This way my cat and I both get some good excercise. ;)

torstai 13. kesäkuuta 2013

DIY Drum cases

Here are suitable drumcases made from an old dry toilet (fortunately it's never been used) and a water barrel. I can fit my 14" tomtom and 14" snare to the bigger one and 10" snare and 12" tomtom to the smaller one.

Starting point 1
Starting point 2

Adding the padding 1
Adding the padding 2

Painting 1
Painting 2

Done!


tiistai 5. helmikuuta 2013

Recycling drumsticks (DIY Drum Stick Modifications)


Old drumsticks have many uses. Here's couple of them:

1. Stun the fish you catch with an old drumstick
This was made MacGyver style in the last minute when my friend was picking me up for an ice fishing trip. You need a duct tape, a piece of metal pipe and of course a drumstick, so go and smash one! I'll add a huge hook on the bottom of this stick later, so this will serve me later also as a lifting hook for even bigger catches.


2. Vacuum cleaner wheels made from old drumstick
My vacuum cleaner was broken pretty badly. I was going to throw the whole thing away, because finding the spare parts wasn't an easiest task. But as it is, the solution is always next to you. First I repaired its hose. I opened the hose adapter, shortened the hose a bit with scissors and glued them back together with Extreme Repair glue. Yesterday I replaced old broken plastic wheels with a pieces cut from old Vic Firth drumsticks. These 7A:s were the only models I've in my apartment at the moment. I think model 2A or 2B would be best size for this kind of mod. ;)

So my advice is to save your old drumsticks if possible. You never now when you need them and what for.

3. Warming up your sauna

(All pictures by me except 3. by J. Järvinen)

sunnuntai 27. tammikuuta 2013

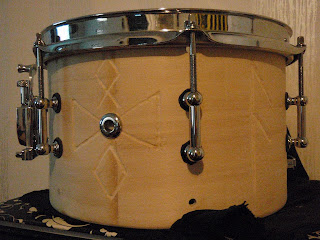
Snaretalk Pt. II: Postmortem and Remembrance (DIY Tom to Snare conversion)

Finally got a chance to assemble this snare. I'm going to change the drum heads as soon as possible. I know it's not perfect, but it will do. This snare project took me over a year, but it was definitely worth it. Feel free to ask anything and I'll try to answer. Long story short:


Making this kind of equipment by yourself teaches you a lot. Of course a lot about drumming and also a lot more about your life and yourself. It brings forth your memories, even the painful ones. And I wan't to share some of them with you.

It's been about 16 years from that when I first played or even stood next to a real drumkit. If I remember correctly it was year 1997 and we were just about to start a fifth grade. That meant our class had to go to bigger school which was located 3 kilometers away from my home. The biggest change for me was that there were more musical instruments, especially band instruments, such as drums, guitars and so on.

I remember we had this old drum kit on our class room and it was missing a bass drum resonant head. Other class room for music class students had a Tama Rockstar drumkit and everyone was hoping to get to it also outside the music lessons. During the playtime in school we used to sneak into the music class and play our asses off.  I always wanted to go to actual music class, like my sisters did, but I couldn't get through the entrance exam.

I had played violin in music school for a while and in the long run it was quite boring. By the way, this was totally disproved in last summer by Kronos Quartet when they played at Kuhmo Chamber Music Festival. Violin really is also a percussion! What a show they put up! But during my short career as a violin player, I was so frustrated that I used to hack'n'slash my notes with a violin bow, and "accidently" take a violins bridge away so I couldn't practice anymore.

Me and my friends started to play "air drums" after the school and I even build my first barrel drumkit with the help of my father. After a while I jumped from violin to tenor horn. My teacher was also playing drums and because a tenor horn wasn't my kind of instrument he agreed to teach me drumming privately.

At first he asked me if I would like to learn to play with a double bass drum (I had almost broken my single pedal for trying to use it as a double bass pedal). Of course I wanted, so he carried another bass drum to the room. It was a different size, but it didn't matter. Goddamit, now I had two of them and I could play machine gun patterns all evening! After the first lesson I knew this was the right instrument and path for me. After that he helped me to tune my drum kit and we had many good conversations about metal bands like Sepultura during the theory lessons he held.

After primary school we moved to Southeast of Finland and I gained my access to the music class without entrance exams. There the teacher always said I played too loud, so there was usually some other guy playing drums during the classes, while I was trying to sing my lungs off. But we had couple of school projects where I could play rock and metal style songs. I wasn't interested in other instruments at the time, maybe I've should've.

I never imagined to reach this point when my parents bought me this used drum kit about 15 years ago:


lauantai 26. tammikuuta 2013

Snaretalk (DIY Tom to Snare Conversion)

Howdy!

Do you still remember that 10" tom I was going to convert to a snare? Well, now it's completely destroyed... Hahaa, just kidding! Last night I upgraded it to a whole new level by adding some Supi Saunavaha on it. It is a stainlike wax for wooden surfaces made from natural compounds. That stuff is usually used for sauna benches (propably best translation for 'saunanlaude'). The Instructions said it's not recommended for oiled surfaces, but I did it anyway. Because I can.

At first I tested wax on a piece of normal plywood, and it seemed to absorb well despite the oil. A bit of sandpaper and a steel brush did the job. So, firstly I used the steel brush to open a wood grain a bit, then roughened the surface with sandpaper, cleaned it with a brush and a vacuum cleaner. After that I finally added couple of layers of stain on it with a help of a piece of foam. Inside of the snare is then again opened a bit with the steel brush. It gives that special antique look I was looking for. After that I engraved those runes again, so they burst into the sight better. I'm sure there is no better time to do that, for gods sake it is full moon now!

I'm still thinking the right name for this piece of percussion. Something from the Finnish Mythology maybe...

I'm still in need of the appropriate snare heads before testing the sound itself.

Cut the bullshit, here's the situation for now:

Phases I, II and III

I'm in a hurry now, so pictures of full assembled snare coming later. Ride on!

-A. Heiskanen

keskiviikko 11. heinäkuuta 2012

DIY Drum kit modification

Hola!

We made a rawmix-sample from the upcoming and yet unnamed Karelian Warcry album. You'll hear how my drumkit sounds at the moment. Check it out from here!


I also stained my drumkit at last and I'm very happy with the results. See for yourself!

Stained floor tom and bassdrum on the back.

Stained floor tom and bassdrum.

Watching the scenery , while fishing near our recording location.

Otherness

keskiviikko 6. kesäkuuta 2012

Long time no see... (DIY Tom to Snare conversion)

 ...and no improvements for my equipment. Until this week...

Remember that 10"tom I lowered last year? I've been working with it and here we go. I need some suitable snare heads for it, so I can test how this beauty sounds. The Engravements was made with a dremel and I needed to drill some new holes for a snare strainer. Still not sure rather I should fill all of those old lugholes or leave half of them open as it is now.

Bearing edges was made using a sandpaper and  small tube, similar to this: http://www.prisma.fi/tuotekuvat//large/80/bmm2rlfnga2ljdpv.jpg
I rolled drum around in a tub and sanded in suitable angle with piece of wood and/or a carboard roll, depending what I wanted to accomplish. Top edge is like 30/60 and quite sharp. Bottom edge is more flat, round-like from the outside and sharp edged from the inside.

I felt my drummers balls descending to my knees during this project. It will be reaaady sooon!

Couple of pictures, here you go:


The rest of my kit remains still unfinished from the outside of shell. I added some mahogony antique wax to inside of the shells. Any suggestions for the outside or should I leave it natural, adding only some beeswax for them?

maanantai 23. tammikuuta 2012

Studio Purtilo (DIY Drum kit modification)

We are recording new material for upcoming Karelian Warcry album. I've been planning to rip off the wraps from my drum kit to get more open sound. So now was the right time to do it. I will add some wax on the shells later.

Starting point

Bass drum got new wooden hoops on them

Chaos reigns pt. 1

 Chaos reigns pt. 2 

Temporary window seal patent for protecting the new hoops

Tuning on process (Toms: Evans EC2 coated/Remo Diplomat reso  Bd: Power stroke 3/Aquarian Regulator reso)

Miking setup

The set of the mad drummer